Compression Isn't Magic#
At the conceptual level, compression is the same idea as writing "a x 19" instead of "aaaaaaaaaaaaaaaaaaa" — represent the same information in fewer characters. The trick is finding the right representation.
A 12-megapixel color photo occupies roughly 36MB in its raw, uncompressed form (4000 x 3000 pixels x 3 color channels). Compress it to a 200KB JPEG and you've discarded roughly 99.4% of the original data. How can you throw away 99.4% of the information and have the image still look right?
The answer is not mathematical cleverness. It's biology. The human visual system has measurable weaknesses — frequencies it barely registers, color detail it cannot resolve, patterns it fills in from context. Every lossy image codec exploits these weaknesses. The codec's job is to discard precisely the data the eye won't miss.
From Pixel Matrix to Byte Stream#
A raw image in memory is a grid of pixel values:
text
Understand the JPEG pipeline and you understand the core ideas behind every lossy image format.
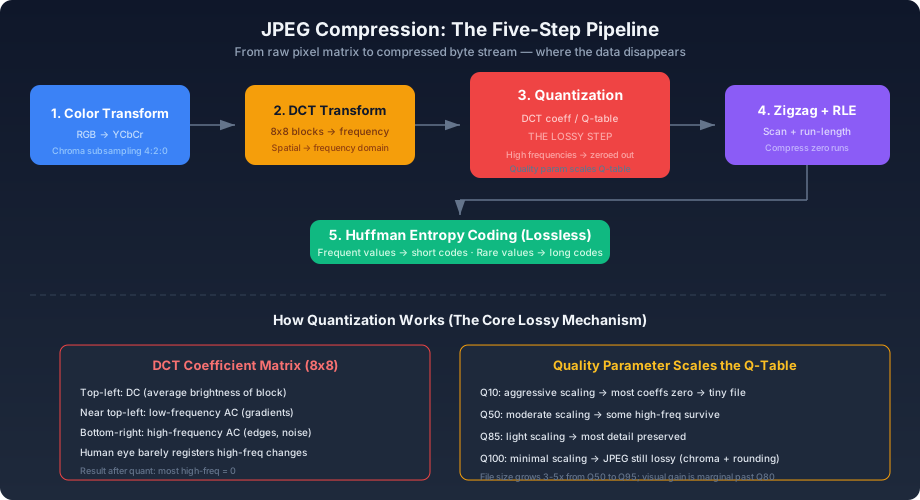
JPEG Compression: Five Steps#
Step 1: Color Space Conversion and Chroma Subsampling#
JPEG first converts RGB to YCbCr:
text
Separating brightness from color allows the encoder to treat them differently. The most common chroma subsampling pattern, 4:2:0, stores Cb and Cr at half the horizontal and half the vertical resolution of Y:
text
This step is perceptually near-lossless — the eye resolves luminance detail at far higher fidelity than color detail. But in data terms, it's already discarded 50–75% of the color information before the main compression even starts.
Step 2: Block Partitioning and DCT#
JPEG divides the image into 8x8 pixel blocks and applies a Discrete Cosine Transform to each block. The DCT converts 64 spatial pixel values into 64 frequency coefficients:
text
The eye is highly sensitive to low-frequency information (large areas of smooth color) and much less sensitive to high-frequency detail (fine texture, noise). The DCT doesn't discard anything yet — it just reorganizes the data into a form where the next step can target the right frequencies.
Step 3: Quantization — The Actual Lossy Step#
This is where the data disappears. A quantization table is an 8x8 matrix where each position corresponds to a DCT frequency coefficient. The encoder divides each DCT coefficient by the corresponding quantization table value and rounds to the nearest integer:
text
Larger Q-table values mean more aggressive compression. The bottom-right (high-frequency) values are much larger than the top-left (low-frequency) ones — because the eye won't notice if high-frequency detail is discarded. After quantization, many high-frequency coefficients round to zero.
The JPEG "quality" parameter is a single number that scales the entire quantization table:
js1function scaleQuantizationTable(baseTable, quality) {2 let scale;3 if (quality < 50) {4 scale = Math.floor(5000 / quality);5 } else {6 scale = Math.floor(200 - quality * 2);7 }8 return baseTable.map(row =>9 row.map(v => Math.max(1, Math.min(255, Math.floor((v * scale + 50) / 100))))10 );11}
Lower quality means a larger scaling factor, which means more aggressive quantization, which means more coefficients round to zero, which means fewer bits to encode. This is why JPEG Q50 and Q95 can differ by 3–5x in file size — the Q-table at Q50 zeros out far more frequency data.
Step 4: Zigzag Scan and Run-Length Encoding#
The quantized 8x8 block is read in a zigzag pattern — starting at the top-left (DC, low frequency) and winding toward the bottom-right (high frequency). This one-dimensional ordering groups the surviving non-zero coefficients at the start and places the strings of zeroed-out high-frequency coefficients at the end. Run-length encoding then compresses those consecutive zeros into compact "(skip N zeros, next non-zero value)" pairs.
Step 5: Huffman Entropy Coding#
The final step is lossless. Huffman coding assigns shorter bit patterns to values that appear frequently and longer patterns to rare values. The encoder and decoder share a Huffman table — a dictionary mapping values to variable-length codes. This is pure information theory at work, and it's the same principle ZIP uses.
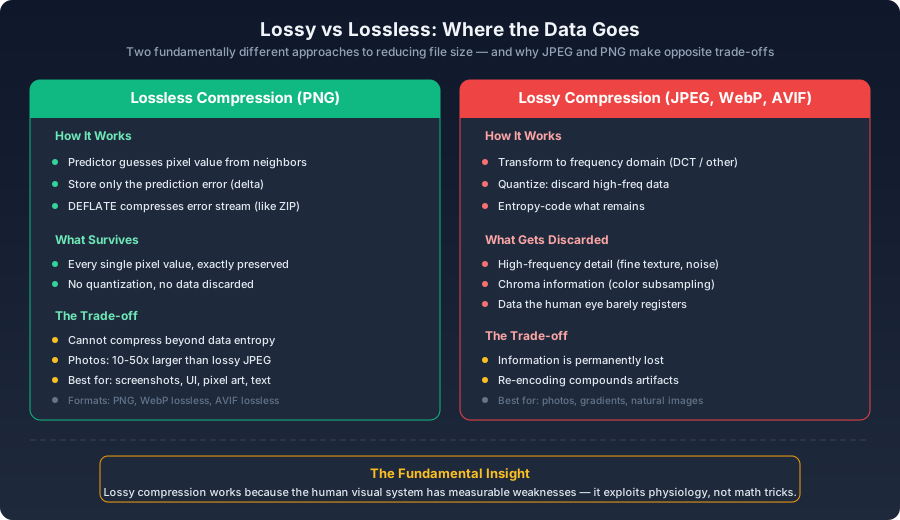
Lossless Compression: The PNG Approach#
PNG skips the DCT and quantization entirely. Instead, it uses a predictor to guess each pixel's value based on its neighbors, stores only the prediction error, and compresses that error stream with DEFLATE (the same algorithm ZIP uses).
PNG doesn't quantize — every pixel value is preserved exactly. That's why PNG files for photographs are 10–50x larger than JPEG. The predictor finds patterns in adjacent pixels, but photographs have too much variation for the predictions to be consistently accurate, and DEFLATE can't compress widely-scattered prediction errors efficiently.
This is the fundamental trade-off: JPEG is willing to discard data the eye won't miss. PNG is not. That single difference accounts for the entire file-size gap between the two formats.
How Modern Codecs Build on These Ideas#
WebP retains JPEG's basic DCT + quantization framework but improves it with variable block sizes (4x4 to 16x16 instead of fixed 8x8), more sophisticated intra-block prediction, and arithmetic coding instead of Huffman.
AVIF abandons the JPEG framework entirely. Built on the AV1 video codec, it uses block sizes up to 128x128, 56 directional prediction modes, multi-stage loop filtering that repairs compression artifacts at decode time, and 10–12 bit color depth that eliminates banding. The result is files roughly half the size of JPEG at equivalent quality — not from one clever trick, but from replacing every component of the 1992 design with modern equivalents.
Experimenting with Quality#
js1const sharp = require('sharp');2 3async function visualizeQualityImpact(inputPath) {4 const qualities = [10, 30, 50, 70, 90];5 6 for (const q of qualities) {7 const buffer = await sharp(inputPath)8 .jpeg({ quality: q, mozjpeg: true })9 .toBuffer();10 11 const raw = await sharp(inputPath).raw().toBuffer();12 const ratio = (buffer.length / raw.length * 100).toFixed(1);13 14 console.log(`Q${q}: ${(buffer.length/1024).toFixed(0)}KB (${ratio}% of raw)`);15 }16}
File size spreads 3–5x across the Q50–Q95 range. But perceived quality flattens well before the file size does — beyond Q80, most people cannot distinguish the compressed version from the original in a blind comparison. The bytes keep growing long after the visual improvements stop.