The Dilemma#
You're preparing a new page for launch. Product photos, background images, and team headshots total nearly 15MB. PageSpeed Insights throws a wall of red warnings; LCP clocks in above 4 seconds. You open a compression tool, drag the quality slider to 60%, and the file sizes drop — but the images look soft, gradients show banding artifacts, and text overlays have halos around the edges. You grudgingly drag the slider back to 90%. The files stay large. The scores stay low.
By the end, you'll understand the mechanics of lossy and lossless compression, how perceptual quality diverges from mathematical quality, where the inflection points sit for each major format, and how to build an automated pipeline that hits the right trade-off every time.
Two Foundational Concepts#
Lossy vs. Lossless Compression#
Perceptual Quality vs. Mathematical Quality#
SSIM (Structural Similarity Index) and PSNR (Peak Signal-to-Noise Ratio) are the standard mathematical quality metrics. But they have a well-documented gap from what humans actually perceive:
- An image with high PSNR can look terrible because of localized artifacts that the global average misses.
- An image with lower SSIM can look perfectly fine because the structural differences SSIM detects are in regions the eye doesn't attend to.
Modern encoders — libaom for AVIF, libwebp for WebP — optimize against perceptual metrics like SSIMULACRA2 and Butteraugli rather than raw PSNR. These metrics model characteristics of human vision: contrast sensitivity as a function of spatial frequency, masking effects (where texture in one channel hides artifacts in another), and the eye's non-uniform sensitivity across the visual field.
This is why AVIF at quality 50 can look subjectively better than JPEG at quality 85 despite "only" having half the quality setting — the metric scales are simply different, and the underlying optimization targets are different too.
The Format Decision Tree#
Choosing the right format is the single highest-leverage decision in image compression. The wrong format can cost you 5–10x in file size for the same perceptual quality:
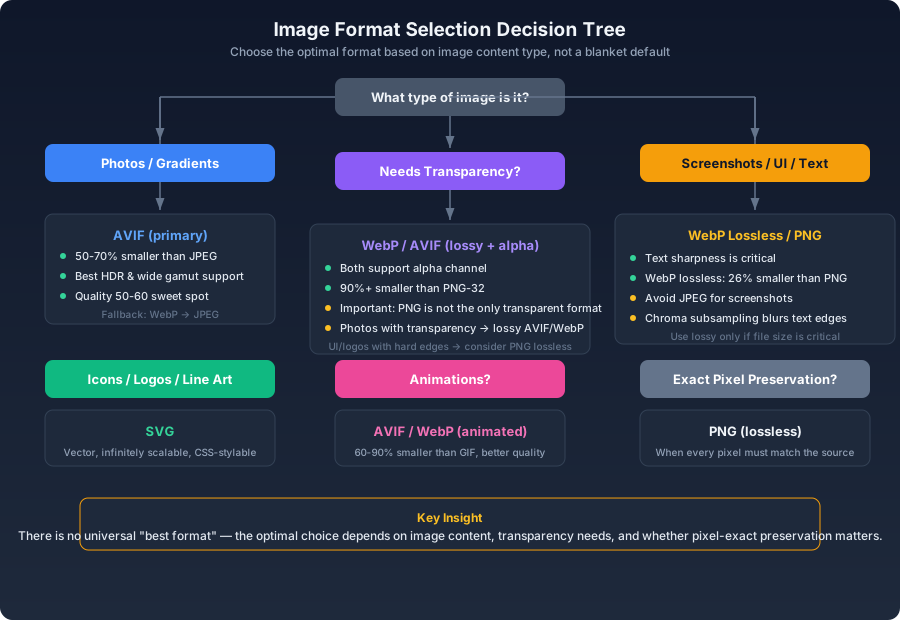
| Image Type | Primary Format | Rationale |
|---|---|---|
| Photographs, rich gradients | AVIF / WebP | Lossy efficiency is dramatically better than JPEG |
| Icons, logos, line art | SVG | Vector format; mathematically perfect at any scale |
| Screenshots, UI elements | WebP lossless / PNG | Pixel-exact text rendering is non-negotiable |
| Photos with transparency | WebP / AVIF | Both support alpha; 90%+ smaller than PNG-32 |
| Animations | AVIF / WebP animated | 60–90% smaller than GIF with better color fidelity |
The decision tree above walks through this systematically. The key principle: there is no universal "best format." The optimal choice depends on image content, the need for transparency, and whether pixel-exact reproduction matters.
Finding the Perceptual Inflection Point#
Every lossy encoder has a quality parameter range where the curve bends. Below the inflection, increasing quality produces meaningful visible improvements with modest file size growth. Above it, file size accelerates while perceived quality asymptotes.
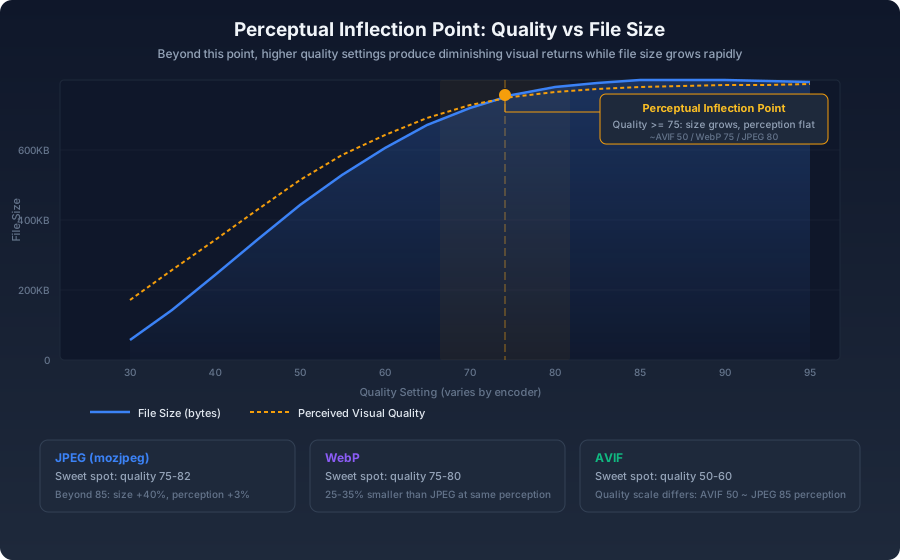
The chart illustrates the pattern. The file size curve (solid blue) bends upward as quality increases — the encoder is allocating more bits to represent detail the eye can barely resolve. The perceived quality curve (dashed gold) flattens, because once artifacts drop below the just-noticeable-difference threshold, further improvements are invisible.
Empirical Inflection Points by Format#
You can find the inflection point for your specific images by sweeping quality parameters:
js1const sharp = require('sharp');2 3async function findOptimalQuality(inputPath) {4 const results = [];5 6 for (let quality = 60; quality <= 95; quality += 5) {7 const output = await sharp(inputPath)8 .jpeg({ quality, mozjpeg: true })9 .toBuffer();10 11 results.push({12 quality,13 sizeKB: (output.length / 1024).toFixed(1),14 });15 }16 17 console.table(results);18 // Look for the point where size delta accelerates19 // while visual inspection shows minimal gain20}
dssim or butteraugli to automate the comparison against the source. The general reference points:- JPEG (mozjpeg): quality 75–82. Beyond 85, file size grows ~40% with imperceptible visual gain.
- WebP: quality 75–80. A solid starting default for most photographic content.
- AVIF: quality 50–60. The quality scale differs from JPEG — AVIF 50 roughly approximates JPEG 85 in perceived quality.
AVIF's lower numerical quality setting is not a sign of more aggressive compression. It reflects a different rate-control model in the underlying AV1 codec. The scale simply shifts; the perceptual result is equivalent or better.
Resolution Matching#
A 4000px-wide photo displayed in an 800px card forces the user to download approximately 25 times more pixel data than necessary. The browser will downsample it, but only after paying the full transfer cost.
html1<img2 srcset="3 /img/hero-640w.avif 640w,4 /img/hero-1280w.avif 1280w,5 /img/hero-1920w.avif 1920w6 "7 sizes="8 (max-width: 768px) 100vw,9 (max-width: 1280px) 80vw,10 1200px11 "12 src="/img/hero-1280w.avif"13 alt="Hero image"14/>
Progressive Encoding#
Baseline JPEG renders top-to-bottom. On slow connections, the user stares at a partially-revealed image. Progressive JPEG loads a full-image preview at low resolution first, then refines it — the user sees the whole picture immediately, just slightly soft:
js1await sharp(input)2 .jpeg({ progressive: true, mozjpeg: true })3 .toFile('output.jpg');
WebP and AVIF support analogous progressive decoding natively; no extra configuration is required.
Automated Optimization Pipeline#
Manual per-image tuning doesn't scale. Integrate compression into the build:
js1// scripts/optimize-images.js2const sharp = require('sharp');3const { glob } = require('glob');4 5async function optimizeImages() {6 const images = await glob('public/images/**/*.{jpg,jpeg,png}');7 8 const jobs = images.map(async (file) => {9 const pipeline = sharp(file);10 11 await Promise.all([12 pipeline.clone()13 .resize({ width: 1200, withoutEnlargement: true })14 .avif({ quality: 52 })15 .toFile(file.replace(/\.\w+$/, '-1200.avif')),16 17 pipeline.clone()18 .resize({ width: 1200, withoutEnlargement: true })19 .webp({ quality: 78 })20 .toFile(file.replace(/\.\w+$/, '-1200.webp')),21 22 pipeline.clone()23 .resize({ width: 400, withoutEnlargement: true })24 .avif({ quality: 48 })25 .toFile(file.replace(/\.\w+$/, '-400.avif')),26 ]);27 });28 29 await Promise.all(jobs);30 console.log(`Optimized ${images.length} images`);31}
CDN-Level Dynamic Transformation#
If you're using an image CDN (Cloudflare Images, imgix, Cloudinary), upload the highest-quality source once and derive variants through URL parameters:
text
This eliminates the need to pre-generate every variant and makes it easy to adjust quality strategy retroactively across your entire asset library.
Quality Monitoring#
js1module.exports = {2 performance: {3 maxAssetSize: 200 * 1024, // 200KB per asset4 maxEntrypointSize: 300 * 1024,5 hints: 'error',6 },7};
Pair build-time budgets with CI-integrated Lighthouse assertions so that any change that balloons image payload is caught before it reaches production.
Common Misconceptions#
"PNG is lossless, so it's the highest quality"#
PNG is lossless for the pixel data it stores, but it's catastrophically inefficient for photographic content. A 1200px-wide photo saved as PNG might be 2–3MB. The same image as AVIF at quality 50 can be 60–80KB and look perceptually identical. "Lossless" is a property of the compression algorithm, not a guarantee of visual fidelity — and in the case of photos, it comes at an enormous byte cost.
"Quality 100 means the original image"#
JPEG at quality 100 is not lossless. It still applies chroma subsampling (unless you explicitly disable it) and frequency-domain quantization. The DCT coefficients are simply stored with higher precision. True mathematically lossless encoding is only available from formats that explicitly offer a lossless mode: PNG, WebP lossless, AVIF lossless, JPEG-LS, and JPEG XL.
"Compress once and you're done"#
Re-compression is cumulative. If a user uploads a JPEG that was already compressed at quality 80, and your server re-encodes it as JPEG at quality 80, you've stacked two generations of quantization artifacts. Each generation discards different high-frequency coefficients, and the errors compound. Keep source images in a lossless format for as long as possible, and apply exactly one lossy encoding step at the final output stage.
"One setting fits all images"#
A product screenshot with fine text and a landscape photograph have fundamentally different compression tolerances. Text edges are sensitive to chroma subsampling and blocking artifacts; landscapes can tolerate aggressive chroma compression but need luminance detail preserved. Classify images by content type and apply type-specific settings rather than a single blanket configuration.
Summary#
Compressing images without visible quality loss is not about finding a magic universal parameter. It's about understanding four things:
- Format selection — Match the encoder to the content type. This single decision can account for 50–70% of the potential file size reduction.
- The perceptual inflection point — For each format, find the quality value where the curve flattens and stop there. Every point beyond it is wasted bytes.
- Resolution matching — Output only the pixels the display actually needs. A 2x multiplier for Retina displays is the ceiling.
- Single-pass encoding — Keep sources lossless and encode exactly once at the final output stage. Stacked lossy compression compounds artifacts.
Automate these four decisions into a pipeline, and "my images are too large" stops being a recurring problem.