Why Optimize Before Upload#
Most projects handle image optimization after the file arrives on the server: the user uploads a raw photo, the server processes it, and the optimized version goes to storage. This sequence has structural problems:
- Server-side processing consumes CPU under load. When dozens of users upload simultaneously, the encoding queue backs up.
- Users upload files directly from their cameras — 3–8MB for a typical smartphone photo, often at resolutions far beyond what the site displays.
- The server receives a JPEG that may already have been compressed (possibly multiple times) and has to re-encode it, compounding artifacts with no access to the original uncompressed data.
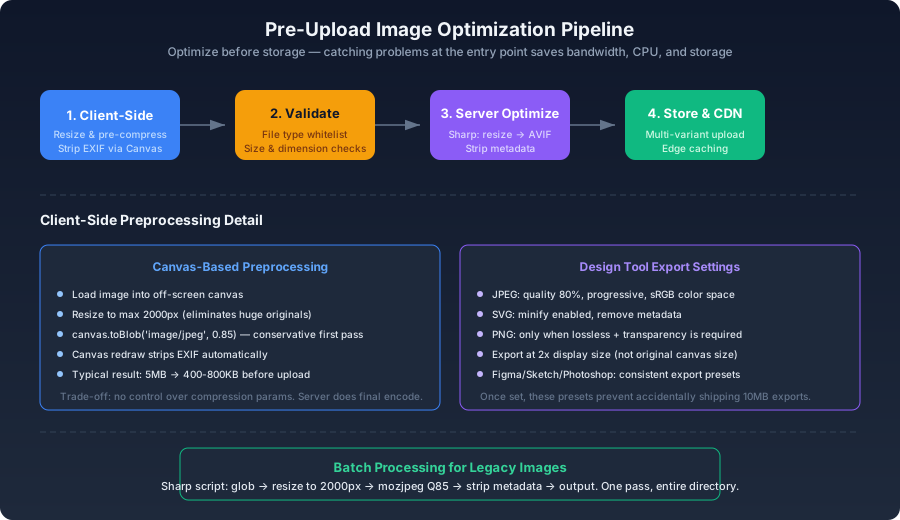
Optimizing before upload — in the browser, at the design export stage, or through content management workflows — shrinks the problem at its source. Less bandwidth consumed on the upload, less CPU spent on the server, and fewer opportunities for cumulative compression degradation.
The Five Verification Gates#
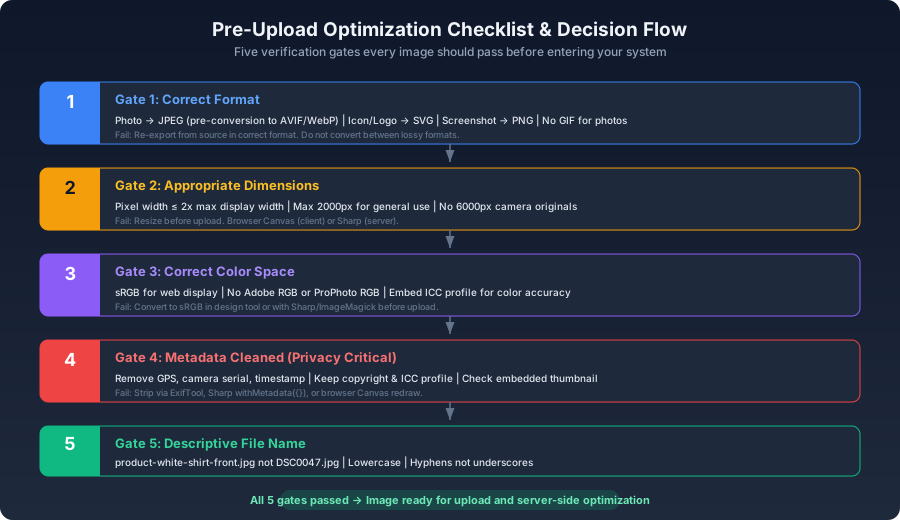
Every image should pass five checks before it enters your system:
Gate 1: Correct Format#
Start with the right format for the content type:
-
Photographs → JPEG (as an intermediate; the server converts to AVIF/WebP)
-
Icons and logos → SVG
-
Screenshots and UI captures → PNG
-
Never use GIF for photographic content
Do not convert between lossy formats at this stage. If a photo is already a JPEG, keep it as JPEG and let the server do the final format conversion from the original.
Gate 2: Appropriate Dimensions#
Pixel width should not exceed 2x the maximum display width. For general-purpose images, cap at 2000px on the longest edge. A 6000px-wide original from a DSLR has no place in a web upload — every one of those pixels costs upload bandwidth and encoding time.
Gate 3: Correct Color Space#
The web runs on sRGB. Images exported in Adobe RGB or ProPhoto RGB will display with shifted, desaturated colors in browsers that don't honor embedded profiles. Convert to sRGB at export time and embed the ICC profile for browsers that do read it.
Gate 4: Metadata Cleaned#
Remove GPS coordinates, camera serial numbers, timestamps, and device identifiers. Keep copyright information and ICC color profiles. This is a privacy requirement, not a nice-to-have — user photos should never leak location data through your platform.
Gate 5: Descriptive File Name#
product-white-shirt-front.jpg, not DSC0047.jpg. Lowercase, hyphens between words. This matters for SEO and for any human who needs to find the file later.Design Tool Export Settings#
Figma, Sketch, and Photoshop all embed export presets. Set them once and every exported image benefits:
- JPEG: Quality 80%, progressive if the tool supports it, sRGB color space. This produces a clean intermediate file that the server can encode to AVIF/WebP without pre-existing compression damage.
- SVG: Minify enabled, remove editor metadata. Most design tools export bloated SVGs full of unused defs layer names and tool-specific XML comments.
- PNG: Only use when lossless transparency is genuinely required. For photos that happen to need an alpha channel, export as JPEG and let the server add the alpha channel via WebP/AVIF lossy+alpha.
Browser-Side Preprocessing#
For applications that accept user photo uploads, a client-side preprocessing step dramatically reduces upload size and strips privacy metadata:
js1async function preprocessImage(file, maxWidth = 2000) {2 return new Promise((resolve, reject) => {3 const img = new Image();4 const canvas = document.createElement('canvas');5 const ctx = canvas.getContext('2d');6 7 img.onload = () => {8 let { naturalWidth: w, naturalHeight: h } = img;9 if (w > maxWidth) {10 h = Math.round(h * (maxWidth / w));11 w = maxWidth;12 }13 14 canvas.width = w;15 canvas.height = h;16 ctx.drawImage(img, 0, 0, w, h);17 18 canvas.toBlob(19 (blob) => {20 if (!blob) return reject(new Error('Canvas toBlob failed'));21 resolve(new File([blob], file.name, {22 type: 'image/jpeg',23 lastModified: Date.now(),24 }));25 },26 'image/jpeg',27 0.8528 );29 };30 31 img.onerror = reject;32 img.src = URL.createObjectURL(file);33 });34}35 36fileInput.addEventListener('change', async (e) => {37 const file = e.target.files[0];38 if (!file || !file.type.startsWith('image/')) return;39 40 const processed = await preprocessImage(file, 2000);41 console.log(42 `Preprocessed: ${(file.size / 1024 / 1024).toFixed(1)}MB → ${(processed.size / 1024 / 1024).toFixed(1)}MB`43 );44 45 await uploadFile(processed);46});
Canvas redraw accomplishes three things simultaneously: it resizes the image, applies a first-pass JPEG compression at quality 85, and strips all EXIF metadata in the process. A 5MB smartphone photo typically becomes a 400–800KB upload. The server then does the final encode to AVIF/WebP from this intermediate.
The quality setting of 0.85 is intentionally conservative — you want to eliminate the worst bloat without baking in compression artifacts that will survive through the server's final encode.
Validation After Processing#
js1function validateImage(file) {2 const checks = [];3 4 const allowedTypes = ['image/jpeg', 'image/png', 'image/webp', 'image/avif', 'image/svg+xml'];5 if (!allowedTypes.includes(file.type)) {6 checks.push({ pass: false, msg: `Unsupported file type: ${file.type}` });7 }8 9 const maxSize = 10 * 1024 * 1024;10 if (file.size > maxSize) {11 checks.push({ pass: false, msg: `File too large: ${(file.size / 1024 / 1024).toFixed(1)}MB` });12 }13 14 return checks;15}
A file arriving at the server in excess of 10MB means the client-side preprocessing didn't run — the user may have JavaScript disabled, or the upload bypassed the preprocessing component. Either way, the server should reject it rather than trying to process it inline.
Batch Processing for Legacy Images#
When migrating an existing library — old blog posts, a product catalog with years of unoptimized uploads — a batch script handles the entire directory:
js1const sharp = require('sharp');2const { glob } = require('glob');3const fs = require('fs');4 5async function batchPreprocess(sourceDir, outputDir) {6 const images = await glob(`${sourceDir}/**/*.{jpg,jpeg,png}`);7 let totalSaved = 0;8 9 for (const imgPath of images) {10 const originalSize = fs.statSync(imgPath).size;11 const name = path.basename(imgPath, path.extname(imgPath));12 13 await sharp(imgPath)14 .resize({ width: 2000, withoutEnlargement: true })15 .jpeg({ quality: 85, mozjpeg: true })16 .withMetadata({})17 .toFile(`${outputDir}/${name}.jpg`);18 19 const newSize = fs.statSync(`${outputDir}/${name}.jpg`).size;20 const saved = originalSize - newSize;21 totalSaved += saved;22 23 console.log(`${name}: ${(originalSize/1024).toFixed(0)}KB → ${(newSize/1024).toFixed(0)}KB (${((saved/originalSize)*100).toFixed(0)}%)`);24 }25 26 console.log(`Total saved: ${(totalSaved / 1024 / 1024).toFixed(1)}MB`);27}
.withMetadata({}) with an empty object strips all EXIF, IPTC, and XMP data while preserving the orientation flag. Without orientation preserved, portrait photos may display sideways.CMS Integration#
For WordPress, Strapi, Contentful, or any CMS that accepts image uploads, encode optimization rules into the upload handler:
php1// WordPress: limit max dimensions and set quality on upload2add_filter('wp_handle_upload', function ($file) {3 if (str_starts_with($file['type'], 'image/')) {4 $editor = wp_get_image_editor($file['file']);5 if (!is_wp_error($editor)) {6 $editor->resize(2000, 2000);7 $editor->set_quality(82);8 $editor->save($file['file']);9 }10 }11 return $file;12});
This runs automatically on every upload. Content editors don't need to know about image optimization — the system handles it at the ingestion point.
Building the Habit#
Optimizing before upload is fundamentally about shifting work to the earliest possible point in the pipeline. Design exports should use the correct format, quality, and color space — set the presets once and they apply to every exported image. User upload components need browser-side preprocessing to shrink uploads before they touch the network. Upload endpoints validate type and size at the boundary, rejecting anything that clearly hasn't been through preprocessing. The server performs final encoding to AVIF or WebP before the file hits storage, and batch scripts handle legacy images that predate the pipeline. The original high-resolution files stay backed up so that when better formats arrive, re-encoding starts from the source, not from an already-compressed intermediate.